
Plus Cylinder Retinoscopy Step by Step

Retinoscopy is a technique to obtain an objective measurement of the refractive error of a patient's eyes. The examiner uses a retinoscope to shine light into the patient's eye and observes the reflection (reflex) off the patient's retina.
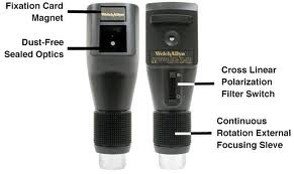
Step 1:Select Your Scope and Place the Focusing Sleeve in the Correct Position
If you select a Welch Allyn, Keeler or Reichert scope, place your focusing sleeve in the 'down' position, Copeland or Nikon, sleeve up. (see 'Continuous Rotation External Focusing Sleeve' in picture below):
Step 2: Establish Your 'Working Distance'.
This correlates to your arms' length to account for the distance between your retinoscope and the patients' eye. If you have an average length arm, this is 67 cm which correlates to 1.50 D 'working distance'. This means you must SUBTRACT 1.50 D sphere from your retinoscopy findings as your final step. If you have a shorter than average arm, select a working distance of 50 cm which correlates to 2.00 D 'working distance' and SUBTRACT 2.00 D sphere from your retinoscopy findings as your last step.
Step 3: Learn How to 'Streak'
'Streaking' means you moveyour retinoscope intercept (the light from your scope) perpendicular to the orientation of your intercept. This means when you orient your streak vertically, you are 'sweeping' (moving) your streak horizontally and vice versa. When you orient your streak vertically, you are checking the refractive power of the 90 degree meridian. When you orient your streak horizontally, you are checking the refractive power of the 180 degree meridian.
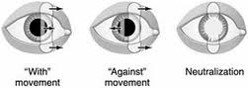
Step 4: Learn What 'With Motion', 'Against Motion' and 'Neutrality' Looks Like.
When your intercept moves in the same direction as the reflex from the pupil, you have WITH motion. This means you must add plus sphere or cylinder (more on this later).
When your intercept moves in the opposite direction as the reflex from the pupil, you have AGAINST motion. This means you must add minus sphere or cylinder.
When the pupil fills with light and there is no movement, you are at neutrality.
Step 5: Position the Phoropter in Front of the Patient
Step 6: Level the Phoropter
Step 7: Fog the Fellow Eye With +1.50 sphere
Step 8: Ask the Patient to Look at the 20/400 E
Step 9: Observe Reflex in Both Meridians
If you see anything other than 'with' motion in both meridians, add minus sphere until both meridians are 'with' motion. Don't be shy about dialing in the minus sphere - just throw it in. Once you see 'with' motion in both the vertical and horizontal meridians, you are ready to begin to neutralize the patient's refractive error.
Step 10: While Checking Both Meridians, Add Plus Sphere.
Continuously check back and forth to the vertical and horizontal meridians until the first meridian is neutralized. This first meridian that neutralizes is your sphere meridian. Note: if both meridians neutralize at the same time, the eye is spherical (this rarely happens).
Step 11: Move to the Opposite Meridian and Neutralize with Plus Cylinder
Add plus cyl until the opposite meridian neutralizes. This is your cylinder meridian and approximate axis.
Step 12: Refine Axis
Use the 'skew phenomena', 'bracketing technique' and the 'straddling technique' to refine the axis. (Explanation of these techniques is beyond the scope of this text. Many of the resources below will explain these techniques).
Step 13: Confirm Neutrality
Move in slightly closer than your working distance (10-20 cm), streak both meridians. You should see WITH motion. Move back slightly beyond your working distance (10-20 cm), streak both meridians. You should see AGAINST motion. If you do, you are AT neutrality. If you do not, recheck neutrality in both meridians at your working distance.
Step 14: Remove Working Distance
Subtract your working distance from whatever the phoropter shows. If you have an average working distance of 67" you must subtract 1.50 D sphere. Example: If the phoropter reads -1.00 +1.00 x 180 you subtract 1.50 D sphere and their final retinoscopy finding is -2.50 +1.00 x 180.
Tips:
Maintain your working distance at all times.
If you get confused during the process, dial the phoropter back to plano and start over.
Look at every reflex you can - even if you don't have time to use the phoropter. Just pick up the scope and look at every patient's reflexes. Knowing what 'with motion' 'against motion' and 'neutrality' look like are half the battle.
Practice - Practice - Practice
You don't have to dilate the patient, but if they have a small pupil it will be more difficult to see the reflex. If the pupil is < 2 mm or so, it may not be possible to see the reflex.
Patients with media opacities (cataracts, cornea opacifications or clouded posterior capsules) may be difficult or impossible to streak... but TRY (what do you have to lose?)
If you see a 'scissors' reflex - meaning it appears there are two reflexes oriented in the same direction but moving in opposing directions, the patient has an irregular refractive error.
Realize that this is an advanced technique. It's the most difficult skill I learned. Don't give up - keep practicing and you will eventually master it. Happy Scoping!!!
See resources below.
How to Perform Retinoscopy Part I: http://www.youtube.com/watch?v=kAreDffuVCQ
How to Perform Retinoscopy Part II:http://www.youtube.com/watch?v=ZjlyDi7iFqc
How to Perform Retinoscopy with loose lenses: http://www.youtube.com/watch?v=ezOoPKZwNDk
Free Retinoscopy Simulator: https://www.aao.org/interactive-tool/retinoscopy-simulator